Tuesday, February 12, 2019

A post about GDC

Attribution: officialgdc flickr

I am an indie developer with a strong interest in #AR. There are a few options for me for upcoming conferences, namely #VRDC and #SIGGRAPH. But each cost around 1500$USD so I can't do both. To help me break down which conference is better/best I started asking myself a few questions and did some price comparisons. This year my goal for both conferences is to LEARN something. There are other reasons to attend conferences (ie. networking, publisher pitch, etc) but for me my focus is on Continuing Education.


At the University of California Santa Cruz Extension office, I can take 9 credits of relevant Continuing Education for ~1500$USD. (awesome courses btw) Let's use that as a standard. If I were to consider how much I would learn, the quality of the material, and the immediate application of the material learned at one of these conferences, would #SIGGRAPH or #VRDC be an equivalent value? For me, the answer is #SIGGRAPH.


When deciding if you are attending #GDC19 or not, please take into consideration the value of what you are getting. Is it contract work? Is it emotional support from friends and colleagues? Is it education? Please use THAT to guide your decision one way or another as the indie life isn't cheap and we all still have basic life needs that also cost money.


We're in this together, even if its not at GDC <3
Read More

Friday, May 11, 2018

Thursday, March 31, 2016

PAX East 2016 Packing List and Pro Tips

PAX is awesome! Everyone who is there loves games and is excited to play them! Demoing your game is emotionally thrilling and physically exhausting. Chris and I host the #IndieMiniBar shared booth each year and have put together a list we share with all the "first time PAX-ers" for packing and a few pro tips. This is by no means a complete list for every scenario/project/team, but we wanted to share with you as a starting point :)

Feel free to add your comments, tips, and other things to pack, in the comments!


Pro Tips:

  • Wear comfy shoes. That floor is cement and it’s a killer.
  • Drink lots of water! Keep your throat moist. You will lose your voice anyways.
  • Get sleep. If you still have the energy to go out and party at the end of the day, you may be Thor.
  • Take pictures. You will want to share them later and they are an awesome reminder of your first public demo <3
  • Make friends with the Freeman union workers. They are the lifeblood of the event and will make your life tons easier if you are nice to them. :)
  • Try to eat well. Convention food sucks. It will make you feel miserable. Boston has a food delivery app called Foodler. Download it and set up an account before you get to PAX. You’ll be able to order decent food and have it delivered :) https://www.foodler.com/
  • Walk around and see the other booths. If you can have someone watch your station for an hour, do it! If not, get to the convention center a bit early so you can see all the booths and say hi to everyone.

Read More

Friday, September 4, 2015

Easy Gridlayout in Unity 5

Hello again!  This week's tutorial on Unity's Auto Layouts is probably one of the more useful tutorials so far.  Auto Layouts are like little hidden gems in Unity's expansive engine!


Unity's UI Rect Transform layout system allows for placing of elements in virtually any arrangement.  However, sometimes a bit more structure is needed.  Unity's easy-to-use Auto Layout system provides ways to place elements in organized, nested layout groups. It also allows elements to be automatically re-sized according to the content.


In this tutorial we will explore the Auto Layout system's Grid Layout, but first let's get to know the Auto Layout system a bit better.

The Auto Layout system is built on top of the basic Rect Transform layout system. It can be used on some or all elements of a group.  The Auto Layout system has two basic components: Layout Elements - those that are nested in groups, and Layout Controllers - those that control the sizes and positions of layout elements.  For a more thorough explanation of Layout Elements and Layout Controllers visit the documentation linked in the description below.


In the Prehistoric Scroller project, I am using the Grid Layout to manage the Inventory window.  Watch as each item is added to the inventory.  As each item is added, the Grid Layout controller re-sizes and re-positions the elements of the group.


Let's look at how this is set up.  On the main camera, a second canvas is added to control the inventory.  The parent game object InventoryItems has the Gridlayout Group attached, and is considered a Layout Controller.  The Grid Layout controller has several properties to set, depending on how you want your grid to behave.

First is Padding.  This is the space on the left, right, top, or bottom **inside** the edges of the layout group. It is the same principle as Padding in the Box Model for web development. For more information on the Box Model, visit the documentation linked in the description below.

Cell Size is the size set for each element in the gird. Just like Excel, the X is the column width, and the Y is the row height.

Think of Spacing as the margin between each column, X, and row, Y.


The Start Corner is the corner where the first element is placed.  It works with the Start Axis and Constraint to control how the grid will grow.

If Upper Left, Horizontal is set, as in the Prehistoric Scroller, the next element will be placed to the right of the first cell along the horizontal axis until there are four elements in the row.  The fifth element will start a new row.


Child Alignment aligns elements if they don't fill out the available cell space.  This is similar to Paragraph alignment options.  It is important to remember the children Layout Elements have no control over their sizes.

In the Prehistoric Scroller a script enables the inventory items as the player collects them.  Let's add a Sixths item.


 Each of the inventory items are actually buttons I know I have a bone item to put into the game so  lets make this the inventory bone button. I'll speed things up as I configure the button just like normal.  Great! Now let's put the prefab bone item into the scene and see what happens. The bone inventory button displays perfectly in the InventoryItems grid!! Awesome!!

But what if you have an item that is smaller than the cell size you set on the Grid Layout controller?


Let's look at an example.  This cracked egg sprite is much smaller than the bone sprite. When I add it as a Layout Element its size is being controlled by the GridLayout controller and its scaled to be larger and doesn't really look nice.


To avoid this,I'm going to remove the button and add a blank UI Image instead. I'll add the Cracked Egg Button as a child of the Image. I'll speed things up as I format the button. Finished! Now next to the other inventory items the cracked egg looks great!

That's it!! Auto layouts, like the Grid Layout, make it easy to quickly set up organized UI in Unity. See you next time!
Read More

Monday, August 31, 2015

UPDATED!! Sneak Peek at this weeks's tutorial!

More sneak peeks! Easy GridLayout in Unity 5 video and full transcript will be live Friday!!


Hi everyone!  I hope you had a fantastic weekend!! I'm working on the next Unity tutorial video during PAX Prime. I am sooooo excited for this one!!  Here is a sneak peek at Easy GridLayout in Unity 5!


Read More

Monday, August 24, 2015

Easy 2D Linecasts and Their Colliders in Unity 5


Thanks for waiting for this one folks!  After moving cross country and being bugged down with a sinus infection it feels good to finally have this one published!! Let's get going!


Easy 2D Linecasts and Their Colliders in Unity 5
A line cast is an imaginary line drawn between two points in Unity's world space. Any game object with a collider can be detected and reported back if it touches the line.

In this tutorial, we will explore one  application of linecasts as well as how to set up the colliders for other objects in the scene.


In this prehistoric scroller project, we can see the T-Rex has two lines drawn from it. A long yellow line and a short red line. These lines are purely for debug purposes to give us a visual representation of the linecast start and end points. 

As the scene begins to move, we can see the T-Rex's behavior change when the yellow line touches the player's box collider.  We can see his behavior change again when the red line touches the collider.

Let's look at what is happening in the script!


The linecast only requires a start point and an end point. This is different from the similar Raycast which requires a start point and a direction but no definitive end point.  Linecast optional parameters include layermask, min depth, and Max depth. For more information on these parameters visit the documentation linked in the description below.


The RaycastHit2D reports the collider results and available information from any collider the linecast has hit! It is extremely important to note, only the first collider hit will be reported. 

Be mindful of the linecast's starting point. If it starts inside a collider, only that collider will be reported.

In the prehistoric scroller, I have the linecast start and end points update with the T-Rex's position so the linecast will move with the T-Rex.

The next part of the script controls the T-Rex's behavior based on the information returned by the RaycastHit2D.


If the yellow walk linecast hits a collider on an object named "Player" the T-Rex will begin walking towards the player and the walk animation will play. If he is not already walking.

It's important to point there is a null check wrapped around the if statement. Because this is in the update loop,if the linecast is not touching a collider every frame, the RaycastHit2D will return "null". The"if not null check" makes sure it is only called if the yellow line is touching a collider.

Also, the walk linecast is only drawn if the attack bool is false. 


Let's  look at the Attack line, the small red line. If the Attack line hits a collider on an object named "Player" the T-Rex will switch to attacking the player and the attack animation will play. If he is not already.

This bit of code sets walk to false and attack to true -  which will prevent the yellow walk linecast from being drawn.

Now that you understand how it works, let's watch it again. 

The T-Rex behavior switches from idle to walk when the player's collider touches the linecast. 

When the attack line touches the collider, the yellow walk line is no longer drawn and the T-Rex switches to attacking! Great!!


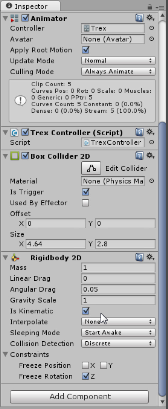
Now let's look at how the collider are set up. In the prehistoric scroller, the player object never moves. The Player collider is considered a Static and no Rigidbody is attached. The T-Rex does move and would be considered a Rigidbody Collider.

Because this project does not use physics, the Rigidbody is set to Kinematic and BOTH collider are Trigger colliders. A trigger simply detects when one collider enters the space of another. It reports the event not the physics.

This means the Player is actually a Static Trigger Collider and the T-Rex is a Kinematic Rigidbody Trigger Collider. 

It sounds more complicated than it is and Unity provides an awesome cheatsheet for determining if one collider will detect the other.  For a thorough explanation visit the documentation linked in the description below!!

That's it!! :D Linecasts are an awesome EASY way to detect colliders in Unity and there are an infinite number of possible ways to use them!!

See ya next time!!

Read More

Friday, August 7, 2015

Thursday, August 6, 2015

Friday, July 31, 2015

Quick Setup Scalable UI in Unity 5


Today, it is important for both designers and developers to be aware of the growing number of devices and device screen sizes available to users.  Unity's powerful UI system makes Scalable UI easy and ensures the same experience for users across devices.

In this tutorial, we will examine how quickly and easily you can set up Scalable UI for your application.

Resources: 
- Unity UI Tutorial Videos: https://unity3d.com/learn/tutorials/m...
- Unity Manual: Button http://docs.unity3d.com/Manual/script... 
- Unity Manual: Canvas Scaler http://docs.unity3d.com/Manual/script...


Read More

Thursday, July 23, 2015

Friday, January 9, 2015

More Animations: Splash!

I've been working on a new animation the past couple of days, using Ron Doucet's tutorial. While this could be done in a few minutes by an artist, it took me a full two days to finish this simple 12-frame animation. BUT I'm happy with how it turned out.  Tomorrow, I'll start working on the color.


Read More

Wednesday, January 7, 2015

Monday, January 5, 2015

Sunday, November 2, 2014

'Nightmares' and FPS

12:56pm


Using Unity's 'Nightmare' project tutorial for my warm up. I'll adjust the player to FP later ^_^ Great intro to the new GUI :D #7DFPS

3:29pm


This "Edit Collider" toggle button in 4.6 is pure magic.

4:15pm


#7DFPS ideas are starting to bubble

7:01pm
Whew! Still going on warm up day for #7DFPS Getting a bit antsy in  my chair but I really do enjoy the project. Especially if you are a beginner to Unity this is a great "next step" after the Roll-A-Ball tutorial

8:10pm

Done!! Great starter project and some wonderful ideas generated!!
Read More

#7DFPS Warm Up!


Hey everyone! I'm pretty excited to announce I will be participating in the 7 Day First Person Shooter game jam!  I'm starting the #7DFPS 7 hour warm-up today and pretty excited to be trying something new ^_^
I'm going to stay in Unity and probably go off some Project assets they have as it will be my first time trying the FPS genre.  This will be an awesome learning opportunity!! :D #7DFPS warm up starts now!!
Read More

Friday, October 24, 2014

The most special thing - my heart in Imagine Me


This shot is really special to me. On last nights Twitch stream (every Thurs at 8pm CDT), one of our long standing community members made a level design suggestion and we implemented it immediately. Live development means we can try crazy things or some not so crazy things suggested by the community. If they don’t work, we just move on, BUT if its something kinda cool, something we hadn't thought of, or something a different perspective brings to light - we can instantly see the game improve. You + Imagine Me = a better game. That is really special to me <3
Read More

Wednesday, October 1, 2014

Hauntings

I had a nightmare the night before last. I was at the house of my grade school years. I had gone into the garage to get something and the garage door was open. It was night and the outside was dark. I looked out into the night and had an instant feeling of fear. I quickly pushed the garage door button. I heard the familiar sound of the mechanism starting and in a slow motion sequence, as I turned to go back into the house a man with a deranged look on his face appeared from the darkness and grabbed me. I think I woke up screaming.
It's still haunting me today and has, in fact, become a source of inspiration for my current work on Imagine Me. weird.

Read More

Saturday, August 23, 2014

My Color

I have thought about inclusive-ity and diversity a TON lately.  I didn't like that my only option was to scream "Hey [under represented group] I want you to be a member of our community!"  There had to be something else I could do.  What was I missing?!?

Today I had an epiphany.  Today I realized for the very first time WHY I wanted the diversity.  It wasn't so I could champion about that I am inclusive.  It finally dawned on me that I WANT to tell the under represented groups they are needed and why they are needed.

We are drawn to things that are like us!! :D  I recently found out the founder of Adafruit is a girl!!  I was so excited!!  A girl!  Someone like me!  Doing something techy!  How cool!!  Google's "Made with Code" is about girls (like me!!) using code (I can do that!!).  I read an article in the Star Tribune featuring the La Semana Culture Camp for adopted kids from Latin America.  The highlighted quote was 'All the kids are my color.'  Meggan Scavio recently recalled a conversation she had with Rami Ismail on how he felt seeing Farsi on a slide at GDC and how moved he was.  It was because there was something he resonated with, something "my color."

That is it.  THAT is what its all about!!  Finding "my color" is why I want to scream from the rooftops:
"Please be a member of the Imagine Me community!!! Be the "my color" for someone.  Please bring your friends.  Find your "my color" with us.  Let me know how I can make that happen for you!  I want it to be a place you feel safe.  A place you can find your color :)"

You may not understand why it's such a big deal to me - especially right now.  That's okay ^_^ I just wanted to tell you, I've found "my color."
Read More